TM 5-3805-260-24
FLYWHEEL
REMOVE FLYWHEEL
Tools Needed
A
FT121
Lifting Bracket
1
S509
Bolt (3/8"-16 NC x 1 in long)
1
start by:
a) remove torque converter*
*This operation is in the POWER TRAIN DISAS-
SEMBLY AND ASSEMBLY section.
NOTE: The engine is removed for better photo illustra-
tion of the removal and installation of the flywheel.
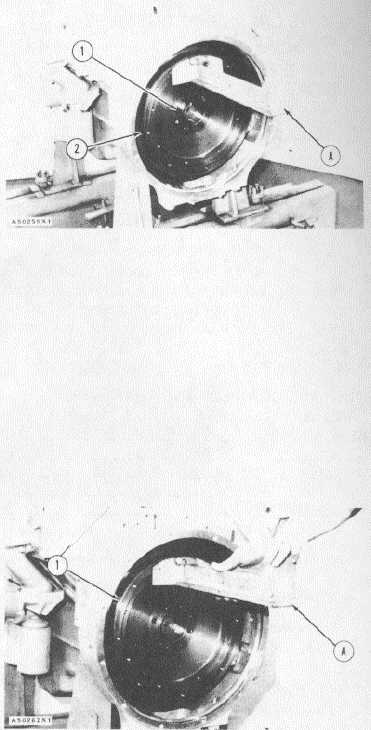
1. Fasten tool (A) and a hoist to flywheel (2).
2. Remove
the bolts (1) that hold the flywheel.
Remove
the flywheel. The weight of the
flywheel is 65 lb. (29 kg).
INSTALL FLYWHEEL
Tools Needed
A
FT121
Lifting Bracket
1
S509
Bolt (3/8"-16 NC x 1 in long)
1
1. Install tooling (A) on the flywheel. Fasten a hoist
and put flywheel (1) in position on the
crankshaft. Make sure the marks on the flywheel
and crankshaft are in alignment.
2. Put 8H5 137 Gasket Sealer on the bolt threads and
install the bolts. Tighten the bolts to a torque of
55 5 lb. ft. (75 7 Nm).
NOTE: Make sure that the correct sealant is put on the
bolt threads. The holes for the bolts in the crankshaft
flange are drilled through so the holes are open to the oil
in the engine. Leakage along the bolt threads can be the
result if the correct sealant is not used.
CAUTION: When a new flywheel is installed, check
the thickness of the new flywheel at the bolt holes in
relation to the thickness of the old flywheel. Install the
correct length bolts so they will be full) engaged in the
crankshaft flange. Bolts that are too long will make
contact with the block on the back side of the crankshaft
flange and pull crankshaft back. This will cause the
crankshaft thrust bearing to fail.
end by:
a) install torque converter*
*NOTE: This operation is in the POWER TRAIN
DISASSEMBLY AND ASSEMBLY.
3-129